| 送交者: jmzjmz[♂★★★★平凡之人★★★★♂] 于 2021-09-19 23:05 已读 1166 次 | jmzjmz的个人频道 |
In this tutorial, I'll show you three easy ways to blend two images
together in Photoshop! We'll start with the most basic way to blend
images, and that's by using the Opacity option in the Layers panel. Then
we'll look at how to get more interesting and creative results using
Photoshop's layer blend modes. And finally, we'll learn how to blend two
images seamlessly together using a layer mask. I'll also include a
quick tip in each of the three sections to help speed up your workflow
and get the best results.Let's get started! 6park.com
How to blend images In Photoshop
For this tutorial, I'm using Photoshop CC but everything is compatible with Photoshop CS6. 6park.com
You can also follow along with my video of this tutorial on our YouTube channel. Or download this tutorial as a PDF and get my Complete Guide to Layer Blend Modes PDF as bonus! 6park.com
Method 1: The Layer Opacity Option 6park.comThe first way we'll look at for blending two images together is by using Photoshop's layer opacity option. Here's the first image I'll be using: 6park.com
6park.comThe first image. Photo credit: Adobe Stock. 6park.com And here's the second image: 6park.com
6park.comThe second image. Photo credit: Adobe Stock. 6park.com If we look in the Layers panel, we see both images on their own separate layers. The beach photo is on the Background layer, and the portrait is on "Layer 1" above it: 6park.com
6park.comThe Layers panel showing each image on a separate layer. 6park.com Related: How to move images into the same Photoshop document 6park.com
The Opacity Value
The Opacity option is found in the upper right of
the Layers panel. By default, it's set to 100%, which means that the
currently-selected layer ("Layer 1") is completely blocking the layer
below it from view: 6park.com6park.comThe Opacity option, set to 100% by default. 6park.com The Opacity value controls a layer's level of transparency. By simply
lowering the value, we make the layer more transparent, allowing some
of the image below it to show through. The more we lower the opacity,
the more the top image will fade into the bottom image. I'll lower the
opacity from 100% down to 75%: 6park.com6park.comLowering the opacity of the top layer to 75%. 6park.com This means that we're now blending 75% of the image on the top layer
with 25% of the image on the bottom layer. And here we see that the
woman is starting to blend in with the beach photo: 6park.com6park.comThe result with the top layer's opacity lowered to 75%. 6park.com If I wanted to fade her even more into the background, I could simply
lower the opacity value even further. I'll lower it to 30%: 6park.com6park.comSetting the Opacity value to 30 percent. 6park.com At 30% opacity, we're seeing just 30% of the top image and 70% of the
bottom image, creating a nice blending effect. You'll want to adjust
the opacity value as needed for your images: 6park.com6park.comThe result with the top layer's opacity at 30%. 6park.com Quick Tip: Setting the Opacity value from the keyboard
Here's a quick tip to speed up your workflow. You can change a
Method 2: Layer Blend Modes 6park.com
layer's opacity value directly from the keyboard. Press 1 for 10%, 2 for
20%, 3 for 30%, and so on. Press two numbers quickly, one right after
the other, for more specific values (like 2 and then 5 for 25%). You can
also press 0 for 100% opacity, or quickly press 0 twice for 0%. 6park.comThe second way we'll look at for blending two images together is by using Photoshop's layer blend modes.
Blend modes are great for blending any two images together, but they're
especially useful for blending a texture with a photo. Here's a
portrait image that I have open: 6park.com6park.comThe first image. Photo credit: Adobe Stock. 6park.com I'll blend the portrait with this texture image: 6park.com
6park.comThe second image. Photo credit: Adobe Stock. 6park.com Again if we look in the Layers panel, we see each image on a separate
layer. The portrait is on the Background layer and the texture is on
the layer above it: 6park.com6park.comThe Layers panel again showing each image on a separate layer. 6park.com The Blend Mode Option
Blend modes in Photoshop are different ways that layers can interact
with each other. The Blend Mode option is found in the upper left of the
Layers panel, directly across from the Opacity option. By default, a
layer's blend mode is set to Normal. "Normal" just means that the layer
is not blending at all with the layers below it: 6park.com6park.comThe Blend Mode option. 6park.com Click on the word "Normal" to open a menu with lots of different
blend modes to choose from. We won't go through all of them here, but I
cover the most important ones in detail in my Essential Blend Modes tutorial. Three of the most popular and useful blend modes you'll want to try are Multiply, Screen and Overlay. The Multiply blend mode creates a darkening effect, Screen creates a brightening effect, and Overlay blends the two layers to increase the overall contrast: 6park.com6park.comThe result with the blend mode set to Multiply (left), Screen (center) and Overlay (right). 6park.com The results you get from the various blend modes will depend entirely
on your images. In my case, I get the best result using the Soft Light blend mode: 6park.com6park.comChanging the blend mode to Soft Light. 6park.com Like the Overlay blend mode, Soft Light blends the two images
together in a way that boosts the overall contrast. The difference is
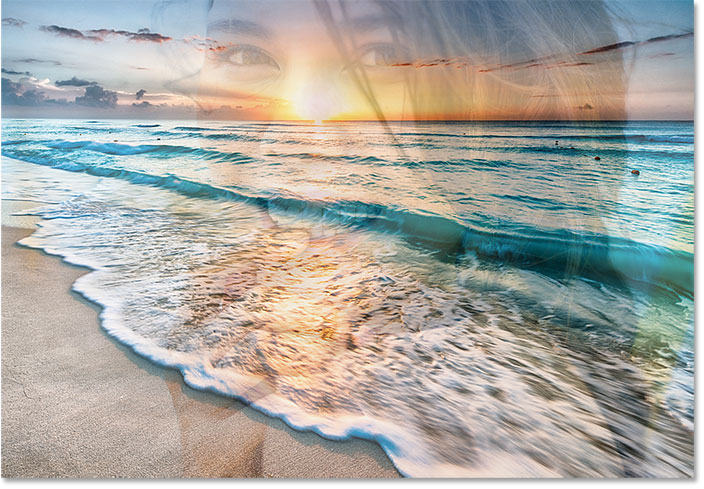
that Soft Light produces a more subtle and natural looking effect: 6park.com6park.comThe result with the blend mode of the texture layer set to Soft Light. 6park.com Another blend mode that works really well with these two images is Divide: 6park.com
6park.comChanging the blend mode to Divide. 6park.com Divide is one of the lesser-known and rarely-used blend modes in
Photoshop. But with these two images, the effect actually looks pretty
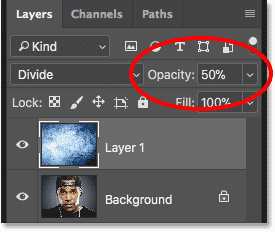
cool: 6park.com6park.comThe blending effect with the texture layer set to Divide. 6park.com Combining blend modes with layer opacity
Once you've chosen a blend mode, you can fine-tune the result by
adjusting the layer's opacity, just as we saw earlier. I'll leave the
blend mode of the texture layer set to Divide and I'll lower the opacity
from 100% down to 50%: 6park.com6park.comLeaving the blend mode set to Divide and lowering the opacity to 50%. 6park.com And here's the result: 6park.com
6park.comCombining the blend mode with a lower opacity produces a less intense effect. 6park.com Download this tutorial as a print-ready PDF! 6park.com
Quick Tip: How to cycle through blend modes from the keyboard
Here's another quick tip to help speed up your workflow and make
Method 3: Using A Layer Mask 6park.com
working with blend modes easier. You can cycle through Photoshop's
various blend modes directly from your keyboard. Press the letter V to quickly select the Move Tool. Then, press and hold your Shift key and use the plus ( + ) and minus ( -
) keys to move up or down through the list. This lets you quickly try
out the different blend modes to find the one that works best. 6park.comThe third way we'll look at for blending two images in Photoshop, and by far the most popular way, is by using a layer mask.
Unlike the layer opacity option or the blend modes which blend entire
images as a whole, layer masks let us control exactly where the two
images blend together. There's lots that we can do with layer masks,
more than we could cover in a single tutorial. So here, we'll just learn
the basics. 6park.comHere's the first image I'll be using: 6park.com
6park.comThe first image. Photo credit: Adobe Stock. 6park.com And here's the second image: 6park.com
6park.comThe second image. Photo credit: Adobe Stock. 6park.com Again looking in the Layers panel, we see each photo on a separate
layer. The dandelion photo is on the Background layer and the girl is on
"Layer 1" above it: 6park.com6park.comEach photo is on a separate layer. 6park.com Adding a layer mask
To add a layer mask, first make sure the top layer is selected. Then, click the Add Layer Mask icon at the bottom of the Layers panel: 6park.com
6park.comClicking the Add Layer Mask icon. 6park.com A layer mask thumbnail appears next to the layer's preview thumbnail: 6park.com
6park.comThe new layer mask thumbnail. 6park.com How a layer mask works
Layer masks control the transparency of a layer, just like we saw
with the Opacity option in the Layers panel. But while the Opacity
option affects the transparency of the entire layer as a whole, a layer mask
lets us add different levels of transparency to different parts of the
layer. In other words, we can use a layer mask to show some areas while
hiding others, making layer masks perfect for blending images. 6park.comThey work by using black and white. Any part of the layer where the
layer mask is filled with white remains visible. And any part of the
layer where the mask is filled with black is hidden. Let's see how we
can quickly blend our two images together by drawing a black-to-white
gradient on the layer mask. 6park.comSelecting the Gradient Tool
Select the Gradient Tool from the Toolbar: 6park.com
6park.comSelecting the Gradient Tool. 6park.com Choosing the Black, White gradient
With the Gradient Tool selected, go up to the Options Bar and click on the down-pointing arrow next to the gradient swatch: 6park.com
6park.comClicking the arrow beside the gradient swatch. 6park.com In the Gradient Picker, choose the Black, White gradient by double-clicking on its thumbnail (third from the left, top row): 6park.com
6park.comChoosing the Black, White gradient. 6park.com Blending the two images together
Make sure the layer mask, not the image itself, is selected by
clicking on the layer mask thumbnail. You should see a highlight border
around it: 6park.com6park.comClicking the thumbnail to select the layer mask. 6park.com Then, click on the image and drag out a black-to-white gradient.
Remember that black will hide that part of the layer, and white will
show it. In my case, I want to keep the left side of the photo (the part
with the girl) visible, so the left side of the mask will need to be
white. I want the right side to be hidden, which means the right side of
the mask needs to be black. Since the gradient will start with black
and end with white, I'll click on the right side of the image and drag
horizontally over to the left. Press and hold your Shift key as you drag to move straight across: 6park.com6park.comDrawing a black-to-white gradient on the layer mask from right to left. 6park.com When you release your mouse button, Photoshop draws the gradient on
the layer mask and blends the two photos together. Here, we're seeing
the girl from the top image blending into the dandelions from the bottom
image. If you're not happy with the first result, simply draw another
gradient on the mask to try again: 6park.com6park.comThe two photos are now blending together. 6park.com Viewing the layer mask
If we look at the layer mask thumbnail in the Layers panel, we see
where the gradient was drawn. The black area on the right is where the
top image is hidden in the document, allowing the photo on the
Background layer to show through. And the white area on the left is
where the top image remains visible: 6park.com6park.comThe layer mask thumbnail showing the gradient. 6park.com We can also view the actual layer mask itself in the document. If you press and hold the Alt (Win) / Option
(Mac) key on your keyboard and click on the layer mask thumbnail,
you'll switch your view in the document from the images to the layer
mask. This makes it easier to see exactly what's going on. Again, the
area of black on the right is where the top layer is hidden from view,
and the white area on the left is where it's visible. 6park.comBut notice the gray area in the middle, where the gradient gradually
moves from black to white. This area creates a smooth transition between
the two layers, allowing them to blend seamlessly together. To switch
your view from the layer mask back to the images, again press and hold
your Alt (Win) / Option (Mac) key and click on the layer mask thumbnail
in the Layers panel: 6park.com6park.comThe dark to light gradient in the middle is what allows the two images to blend seamlessly together.. 6park.com Quick Tip: How to toggle a layer mask on and off
Here's a quick tip for working with layer masks. You can toggle a layer mask on and off by pressing and holding your Shift key and clicking the layer mask thumbnail
in the Layers panel. Click the thumbnail once to temporarily disable
the mask and view the entire layer. A red "X" will appear in the
thumbnail, letting you know that the mask is disabled. Hold Shift and
click the thumbnail again to turn the layer mask back on: 6park.com6park.comHold Shift and click the thumbnail to toggle the layer mask on and off.And there we have it! That's a quick look at how to blend two images
together using the layer opacity option, layer blend modes, and a layer
mask, in Photoshop! To learn more about blending images with layer
masks, see our Layer Masks and Gradients tutorial. Use our Layers Learning Guide to learn more about Photoshop layers, or visit our Photoshop Basics section for more tutorials! 6park.comhttps://www.photoshopessentials.com/basics/three-ways-to-blend-two-images-together-photoshop/ 6park.com